
Restoration of an elderly Lady
When I bought this property together with the main house next door it seemed that the only thing worth saving here were the old grapevine and the peach tree.
Happily, I had other priorities and the bulldozer date kept being moved forward. Then one day an architect friend from Santa Fe (USA) who specializes in Adobe buildings visited. He convinced me that the building was actually very stable and could be saved.
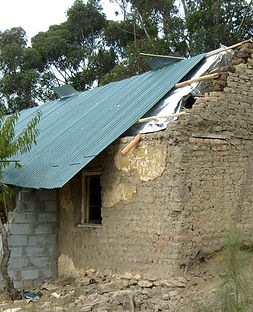
After two major floods in 2007 she still stood …………..!
It was time to do something to save the cottage, so in March 2008 we started work on her. The whole renovation cost ZAR30 000. Most of the cost being for the purchase of a new Cromadeck roof and labour. 95% of the materials were free or already existed on site ready to be re-used.


The North wall was in the process of simply falling out. It had separated from the structural beams, the foundations were slipping from beneath it. The gable was shored up, foundations underpinned, sections of wall rebuilt and fixed to the main wall with steel bars. We saved as much of the gable as was viable, replacing the top of the parapet with re-cycled old unbaked adobe bricks.

From the North-West one can see how badly water ingress damaged the
foundation walls. Deep channels were dug to below the foundation stones in
order to remove the flow of water directly into the walls.
This has solved 85% of the problem but with heavy rains seepage still causes
dampness in these walls. This side is also the rain side. The structure on the right
was a badly built addition which served as a kitchen. It was not properly joined
to the main house causing very bad water ingress. This whole section was
knocked down with only the hearth foundation remaining.
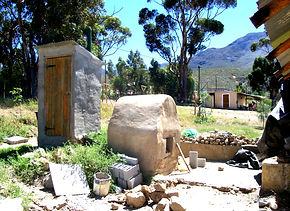
Upon this a new Dutch oven has been built leaving some of the old walls as
seating around the hearth. The back door leading into this section has been
turned into an open fireplace. The original cottage had no back door.

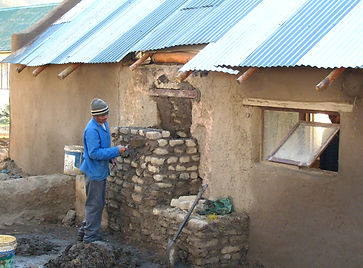


The mortar being used to build with the adobe bricks is simply old clay plaster/rubble we dug out around the house. This was crushed to dust once again, lime added with water and we had perfectly good building mortar once again - For FREE!
It is a very smooth elastic building mortar which is kind to one’s hands.
If these kind of walls are penetrated by rain they will simply melt back into the soil. It is a testament to this builder, who knew his business when making sun-baked adobe bricks, that our walls did not disintegrate.
Upon analysis it was found that he had used a grass/dung mixture with his clay, which acts like a glue.
Bennie October
Team Leader
of the renovation crew building a ‘real’ fireplace.
Unhappily one of our old
Eucalyptus trees fell onto it
during a storm and the
fireplace was replaced with
the present steel chimney
as it was not possible to
rebuild it again.
The South-West corner with the old kitchen extension on the left.
You can see some of the original foundation stones, which we have left exposed.
These cottages had absolutely no foundations as we know them.
A suitable area was flattened, whatever stones could be found locally were packed onto this area -
in this case river stones. The walls were then simply built on top of these stones.
The floor inside the cottage had a 200mm slope! We have installed a level, concrete floor
(a necessary concession using modern materials) as the original adobe/dung
floor was simply not hygienic or sustainable. To get the floor level within the existing
building an interior step at the entrance door had to be created.
The cottage was in danger of sliding down the hillside. As you can see, (left) we had
to build all kinds of structures to shore up the walls as we worked. Somehow we had
to incorporate buttress walls to hold the structure in place without destroying
the aesthetics of the original building…. ?
There was no real space for a bathroom
inside, so this corner received a buttress
wall doubling as the now large shower.
The veranda sort of grew from a buttress
wall, with Bennie & Edmund coming up
with new ideas daily until we ended up
with the present cosy outdoor patio, which
also serves to support a very old grape -
now only good for making excellent
vinegar plus providing shade.
Another buttress wall holds up the interior
wall to the bedroom and doubles as a
shady seat with a view. The buttress walls
are built from cement blocks and stand
on 1.5m wide foundation in order to
support the weight of the cottage leaning
on them. The corners were all strengthened
with steel rebar to old them together.
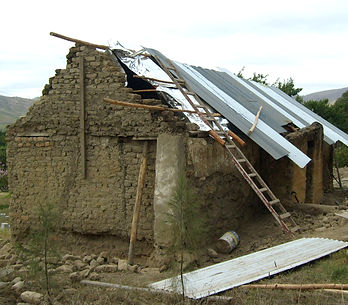
The roof looked badly rusted with the interior rafters rotten and in a state of decay. It was decided to remove the roof and replace the wood structure. We used exactly the same rafter dimensions as the original ones but this time using Eucalyptus trees instead of Pine.
These trees must be cut over a period of 6 days during a Full moon because the juices must flow for the poles to dry hard and have a longer lifespan. The thick bark is removed and nothing further needs to be done to preserve them. We felt that we needed some sort of ring beam to hold the roof in place and support the weight more evenly on the walls, thus an 11m tree was placed on the front and back walls. Hoop iron had been worked to a depth of 80cm into the actual walls in a zig-zag pattern and then tied to the ring beams and the new rafters.
The original cottage had a typical reed ceiling with an adobe/dung floor of 15cm over the top of that - called a ‘brandsolder’ (fire ceiling) - as this prevents a fire from spreading into the cottage. We removed this leaving the original pine beams in place. Only one beam had to be replaced where we removed a crumbling interior wall to create the present living area. The old roof sheets were actually in an excellent condition and were subsequently used to build the feed shed on the next door property.
Recycled Oregon ceiling planks were installed over the rafters with Sisalation to insulate the cottage and on top of that new Cromadeck roof sheets. I would have preferred to thatch the cottage once again but the cost was prohibitive. We also liked the open feeling of the cathedral ceiling from the inside as a low ceiling made the interior a bit claustrophobic. Rain threatened and the whole removal and replacement of the roof took 3 days with literally everyone on site hammering away.


It is absolutely imperative that these walls be able to breathe otherwise internal moisture will destroy the structure, so only natural paints may be used = absolutely no acrylics or PVA.
Our paint is made with unslaked lime and the first coat lasted 5 years without flaking (even on the cement plaster), but had faded so it needed re-doing.
This paint is super cheap and works just as well on cement plaster.
Here is the RECIPE for 20lt of paint @ a cost of + R90.
6.5kg Unslaked lime, 850gr Kosher/sea salt, 500ml raw linseed oil, 2kg yellow oxide colour (exterior).
Put in 2kg lime & salt, slowly add water while stirring. Then slowly add the rest of the ingredients. It is better to leave it overnight but not necessary. It can be used once it has thickened and cooled down.
WARNING: Unslaked lime reacts with oxygen and must be fresh. It starts to boil as you stir it and gets extremely hot so be very careful when mixing. Cover your mouth. The paint is nice and thick but does not roll on well so it must be brushed on.
The adobe plaster goes on in 3 layers:
1. The first layer is a mixture of clay, sand and chopped straw. This is simply pushed into all the holes and walls with your hands leaving a
rough surface. It then needs to dry for a couple of days.
2. The second layer is yet another layer of the same mixture but is now troweled on like normal plaster.
3. This is the fun layer but be WARNED as this layer incorporates lime and literally takes the skin off your hands and burns badly - so if you
ever attempt this - wear gloves! The mixture is the same as above but with less straw and a much finer cut, plus lime. Now you can
mould it into all the shapes your imagination allows.
The ‘builders’ on the team wanted it all nice and square and it took some convincing to make the walls uneven and skew with rounded window casements. Once they got into the fun part of this, we moulded a whole family of mice into the interior chimney walls, which we lost when the chimney was destroyed.

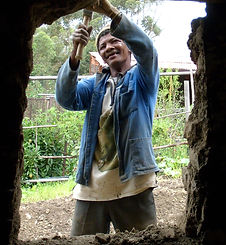
Edmund Sauls
Local resident, bricklayer and plasterer
Graham
Bricklayer with experience in straw-bale building
Hilary du Plessis
The man with all the adobe recipes in his head. Also vast strawbale building experience.
His dagga plants happily grew behind the toilet for a while.
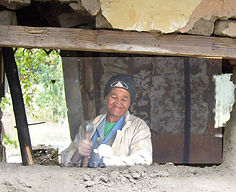
Bennie October
A gem of a team leader able to do almost anything from bricklaying, plastering, plumbing and electrical work. He worked for me for more than a year helping with building cupboards to anything else I could imagine. Bennie has now become a qualified electrician with an excellent job.
Nooi Pitcher
My neighbour who insisted on volunteering as she wanted to learn how to build the old way.
Me -
Angora van Doorn
The team at first thought this ‘white woman’ was a little crazy, especially when I once again had yet another drawing of some new idea but they soon learned that their input was expected and valuable to me.


The original team consisted of Nooi, Bennie, Edmund and myself.
We did all the structural work in 6 weeks but I was stumped when it came to plastering with clay as I had no experience in this field -
enter Hilary & Graham who helped us get the cottage plastered.
Please feel free to contact me if you ever need help in restoring such a building. I am sure we could convince the team to come and help you out.